


What are support and resistance?
Support and resistance are the most fundamental and important concepts in technical analysis; virtually all chart analysis methods are based on them.
- Support: A price range where sufficient buying interest is encountered during a price decline, causing the downtrend to slow or reverse.
- Resistance: A price level at which, during an uptrend, sufficient selling pressure is encountered, causing the upward momentum to slow or reverse.
The underlying principle is the collective behavior of market participants: when prices approach a level where a reversal previously occurred, those who previously profited at that level want to buy or sell again, those who are stuck in losing positions want to break even and exit the market, and those on the sidelines see it as an opportunity to enter the market—these orders cluster in the same area, forming support or resistance.The more times a location is tested and the broader the time frame involved, the greater its reference value.
The most practical feature of support and resistance isRole Reversal: Once support is effectively broken, it often becomes resistance for a subsequent rebound; once resistance is effectively broken, it often becomes support during a pullback. This characteristic forms the basis of the breakout-and-retest strategy discussed later in this article.
Understanding Candlestick Charts: A Prerequisite for Analyzing Support and Resistance
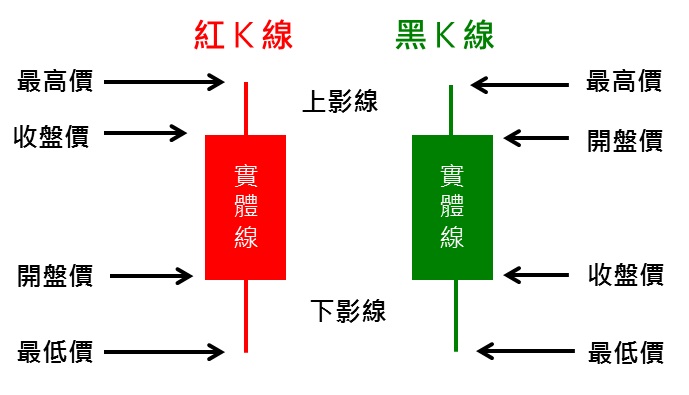
Price analysis is inseparable from candlestick charts. Each candlestick records four prices for a given time period: the opening price, closing price, high, and low.
- Physical: The range between the opening price and the closing price. Green (or white) indicates that the closing price was higher than the opening price, meaning the price rose; red (or black) indicates a decline.
- Shadow Line: The upper and lower lines extending beyond the body represent the highest and lowest prices reached during the period.
When it comes to analyzing support and resistance levels, the wicks provide key information:After the price entered a certain zone, it was pushed back by a long wick....indicating that there is genuine buying interest or selling pressure defending that area—a long lower shadow appearing in a support zone is evidence of strong buying interest, while a long upper shadow appearing in a resistance zone is evidence of heavy selling pressure. We will refer back to this observation repeatedly later when identifying false breakouts.
The Correct Way to Draw Support and Resistance Levels
The most common mistake beginners make is drawing support and resistance levels as "lines" that are precise down to the decimal point. The correct approach is:Support and resistance are zones, not lines.Prices do not reverse exactly at the same level; instead, they fluctuate within a certain range as buyers and sellers battle it out.
Method 1: Horizontal Support and Resistance Zones
- Switch to a larger time frame (daily or 4-hour) to establish a general position first, then switch to a smaller time frame to fine-tune it.
- Find the price that is at leastFlipped twiceThe more times you reverse its position, the more effective it is.
- Use the Rectangle Tool to draw a rectangle around the area between the endpoints of the shadow lines of these reversal points and the edges of the object—this rectangle is your support/resistance zone.
- Once you've finished drawing the entire chart, pare it down: keep only the two to three most critical zones above and below the recent price. Drawing too much is as good as drawing nothing.
Method 2: Trend Lines
In an uptrend, connecting a series of progressively higher lows creates dynamic support; in a downtrend, connecting a series of progressively lower highs creates dynamic resistance. An effective trend line requires at leastThree ContactsNote that these two points are merely assumptions. The same principle applies in reverse: when a support trend line in an uptrend is broken, it often becomes resistance during a rebound. Furthermore, by drawing a parallel line along the trend line to enclose the price movement, you getTrend Channel——The upper and lower tracks of the channel provide dynamic resistance and support, respectively, serving as another entry and exit framework for trending markets.
Method 3: Round Numbers and Psychological Levels
Round numbers like $80,000 for BTC and $2,500 for ETH naturally form psychological support and resistance levels due to the concentration of large pending orders and stop-loss orders, and can be cross-verified with horizontal zones.
Method 4: Fibonacci Retracements and Moving Averages (As Supporting Confirmation)
Pullbacks in trending markets often occur at Fibonacci retracement levels. 38.2%, 50%, 61.8% When prices encounter support or resistance—you can identify these levels by using a tool to connect the starting point and ending point of a clear trend. Additionally, the 20-, 50-, and 200-period moving averages (especially the daily 200MA) are closely watched by a large number of traders and algorithms, making them “moving support and resistance” levels in their own right. The correct way to use these two tools isCorroborated by the horizontal zone: When a Fibonacci level or key moving average overlaps with a horizontal zone you’ve drawn, the reference value of that zone is greatly enhanced; when used alone, the signal is too weak to serve as the sole reason for entering a trade.
A practical test: After drawing the line, ask yourself, “If the price returns to this area, would I dare to place an order as planned?” If the answer is no, it means you haven’t drawn the line objectively enough—redraw it.
How can you spot a false breakout?

A false breakout (also known as a bull trap or bear trap) is the biggest pitfall in support and resistance trading: the price briefly crosses a key level, luring traders chasing the breakout to enter the market, and then immediately reverses direction; as these traders exit via stop-loss orders, they actually accelerate the reversal. Four steps to identify a false breakout:
1. Look at the closing price, not the wicks.A breakout is not considered valid unless the price crosses the zone but the closing price retreats back within it. The larger the time frame used for analysis, the more reliable the result—a breakout is considered valid only when the 4-hour or daily closing price holds firmly outside the zone.
2. Look at the trading volume.A genuine breakout is usually accompanied by a significant increase in trading volume; nine out of ten breakouts with declining volume are false breakouts (see the next section for details).
3. Wait for the backtest results.After a valid breakout, prices often retest the original zone (where resistance becomes support, or vice versa) before continuing in the original direction. Waiting to enter the market until the retest stabilizes may cause you to miss a small number of one-way moves, but it helps you avoid the vast majority of false breakouts, making it a profitable trading strategy in the long run.
4. Pay attention to the surroundings.There are particularly many false breakout signals within a sideways trading range; rapid breakouts during major economic data releases or periods of low liquidity (such as weekends) should also be viewed with a degree of skepticism.
Conversely, a false breakout is, in itself, a high-quality trading signal:When the price breaks through support in a false breakout and then quickly recovers above that level, it indicates that bearish momentum has run out—which is often a strong buy signal.—Because a breakout that triggers short-sellers’ stop-loss orders will fuel the rally. This is precisely the entry strategy favored by “smart money.”
Combining Support, Resistance, and Volume
Trading volume answers one question:Is there any real money behind this price action?Three Core Uses:
1. Verify whether the breakthrough is genuine.A breakout accompanied by trading volume significantly higher than the recent average indicates that it is driven by genuine capital, greatly increasing the breakout’s credibility; new highs or lows reached on declining volume are typically false breakouts or signs of a bearish trend.
2. Determine the strength of support and resistance levels.When the price approaches a support level, if the decline is accompanied by shrinking volume and the rebound by increasing volume, it indicates that selling pressure has subsided and buying interest has emerged, making it highly likely that the support level will hold. Conversely, if the decline toward the support level is accompanied by high volume and the rebound by low volume, the likelihood of the support level being broken increases significantly.
3. Identify hidden support and resistance levels.Price zones where trading activity was particularly heavy in the past (as can be observed in a Volume Profile chart) indicate that a large portion of the market’s cost basis is concentrated there. When prices return to these levels, a battle between buyers and sellers is likely to ensue, providing another layer of analysis beyond chart patterns.
A simple way to remember it:A positive correlation between price and volume (rising prices accompanied by increasing volume, and pullbacks accompanied by declining volume) indicates a healthy trend; a divergence between price and volume (new highs accompanied by declining volume) is a warning sign.
Examples of Entry and Exit Strategies in Real-World Trading
The following three are the most commonly used trading models for support and resistance, and they all follow the same discipline: first set the stop-loss level, then calculate the position size based on the risk amount (for detailed position sizing methods, seeA Guide to Trading Perpetual Contracts)。
Example 1: Going Long at a Support Level (Range Trading)
Assuming ETH reverses upward three times within two months in the $2,330–2,360 range, this is deemed strong support. On the fourth pullback to this range, the 4-hour chart shows a long lower shadow accompanied by a volume-driven rebound.
- Entry: Go long after confirming stability at the upper boundary of the $2,360 zone
- Stop-loss: $2,310 (leaving a buffer below the support zone) — Risk: approximately 2%
- Target: Resistance at the upper end of the range $2,580—return of approximately 9%
- The risk-reward ratio is approximately 1:4.4, which is well above the minimum requirement of 1:2, making it worth executing.
Example 2: Going Long on a Breakout (Trend-Following Trade)
Assuming BTC breaks out of the $78,000 resistance zone—where it has been consolidating for six weeks—on high volume and closes firmly above it on the daily chart, do not chase the breakout; wait for a pullback. Three days later, the price pulls back to around $ 78,000, stabilizes on low volume—resistance has now turned into support.
- Entry: Go long after a backtest stabilization signal appears
- Stop-loss: A drop back below the zone (around $76,300) would indicate a failed breakout.
- Objective: Project based on the height of the range or the previous high
- This model sacrifices a small portion of the entry price in exchange for a "proven" high win rate.
Example 3: False Breakout Reversal (Countertrend Trap Trade)
The price of a certain cryptocurrency fell below the closely watched support level of $0.95, triggering a large number of stop-loss orders and short-selling orders. However, within an hour, it quickly recovered above $0.95, accompanied by heavy trading volume.
- Entry: Go long after the price pulls back above the support level and the move is confirmed.
- Stop-loss: Below the low formed by the false breakout
- Target: Resistance at the other end of the range
- Logic: Stop-loss orders placed by short-sellers act as fuel for the rally; these orders have tight stop-loss levels, trigger quickly, and offer an excellent risk-reward ratio.
Common features of the three models:Before entering a trade, you already know where your stop-loss is, where your target is, and whether the risk-reward ratio is favorable.Don’t place a trade unless you have these three answers—no matter how good the chart looks.
Ready to put what you've learned into practice?
Talking the talk and walking the walk are two different things—the ability to hold support levels can ultimately only be honed in real markets under real emotional pressure. Recommended practical approach:
- 在 Hyperliquid Open an Account (On-chain DEX, no KYC required; simply connect your wallet to start trading. For more information about the platform, seeWhat is Hyperliquid?)
- Use small position sizes and isolated margin mode; trade only within the key zones you’ve identified, with each trade’s risk not exceeding 21% of your total capital (TP3T).
- Record the rationale for entering each trade, the stop-loss level, the target, and the result; after 50 trades, review which model has the highest win rate.
Use a referral code MBHK Sign up to enjoy a 4% discount on transaction fees, which translates to real cost savings over the long term.
Frequently Asked Questions
Q1: Which time frame should be used to plot support and resistance levels? First, identify key levels on the daily or 4-hour chart (the levels that large investors are watching), then switch to the 1-hour or 15-minute chart to fine-tune your entry and exit points. Levels on higher time frames always take precedence over those on lower time frames.
Q2: Does support and resistance become stronger or weaker the more it is tested? A high number of historical reversals indicates that the level is recognized by the market and has high reference value. However, when a level is tested intensively and repeatedly over a short period—with each test depleting the defenders’ orders—the likelihood of a breakdown or breakout actually increases. It is important to distinguish between a “strong level” and a “level on the verge of being breached.”
Q3: How can you tell the difference between a real breakout and a false breakout? Look for three things: whether the closing price on a larger time frame has firmly settled outside the range (a price that only crosses the range via a wick does not count); whether the breakout is accompanied by increased volume; and whether the price stabilizes during a retest after the breakout. A breakout is considered valid only when all three conditions are met; if any one is missing, you should remain on the sidelines.
Q4: I’ve drawn support and resistance levels, but the price often reverses just a few dozen dollars short of them. What should I do if my order isn’t filled? This is precisely the meaning behind “zones, not lines.” Instead of setting the entry condition as “reaching a specific price,” change it to “entering a zone and seeing a reversal signal (long wick, volume-driven rebound).” Use the signal to trigger the entry, rather than waiting for a trade to execute at a precise price.
Q5: Can support and resistance levels be used on their own as a trading system? It can serve as a framework, but it cannot be the whole story. It addresses the question of “where to trade,” but you also need trading volume or candlestick patterns to determine “when to enter the market,” as well as position sizing to determine “how much to bet.” Only when all three elements are in place do you have a complete system. For more details, seeA Guide to Trading Perpetual Contracts。
Next Step: Now that we’ve identified the key levels, we still need a comprehensive framework for entry and exit points—including position sizing, leverage, and stop-loss orders. Continue readingTips for Trading Perpetual Contracts 2026; To learn about the live trading platform, start by checking outWhat is Hyperliquid?。